|
Do you have an Internet connection?
Is your firewall correctly setup to allow VisualIPTrace to work?
Firewalls:
Norton Internet Security 2004
Windows SP2
ZoneAlarm Pro
McAfee
Trend Micro PC-cillin
Do you have an Internet Connection?
To successfully run VisualIPTrace you need to be connected to the internet. If you are viewing this page then your Internet connection is working.
Is your firewall correctly setup to allow Visual IP Trace to work?
There are numerous firewalls available so we have tried to cover most of the popular ones. Basically for VisualIPTrace to function correctly firewalls need to allow ICMP
(Internet control message protocol) to pass through it. This may sound hard but with the step by step instructions below we have tried to make it an easy process for you. If you have a firewall that is not
listed and you think should be then please contact us and we will try and accommodate as many as possible.
Simply choose your firewall from the ones below to view the step by step instructions:
Norton Internet Security 2004
Windows SP2
ZoneAlarm Pro
McAfee
Trend Micro PC-cillin
Norton Internet Security 2004 
Step 1: Click Start --> All Programs --> Norton Internet Security --> Norton Internet Security as shown in fig 3.1 below

Fig 3.1: Click Start --> All Programs --> Norton Internet Security --> Norton Internet Security
Step 2: In the main window of Norton Internet Security, click Personal Firewall as shown in fig 3.2 below
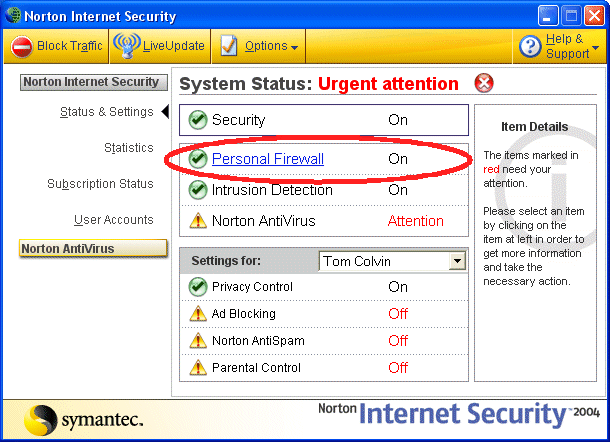
Fig 3.2: Click Personal Firewall in main window
Step 3: Click configure as shown in fig 3.3 below
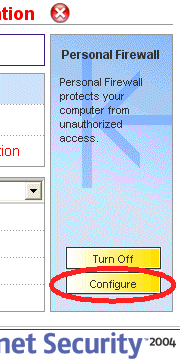
Fig 3.3: Click Configure
Step 4: Click the General button in the Advanced tab as shown in fig 3.4 below
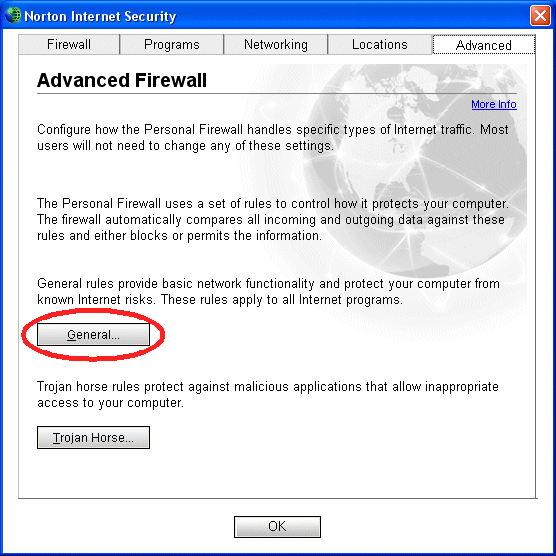
Fig 3.4: Click the General Tab
Step 5: Remove the checkbox next to every rule which specifies 'block' as the action, and 'Protocol: ICMP' in the text as shown in the circled parts of fig 3.5 below

Fig 3.5: Remove the checkbox next to alls rules that specify 'block' as the action
Windows SP2
Step 1: Click Start --> Settings --> Control Panel as shown in fig 4.1 below
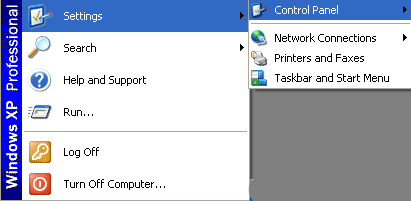
Fig 4.1: Start --> Settings --> Control Panel
Step 2: Once the Control Panel has opened you need to double click the 'Windows Firewall' option that is circled in red below. Note you have to 'Switch to Classic View' to see the Windows Firewall icon,
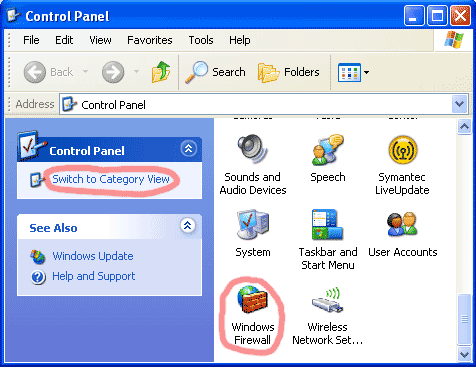
Fig 4.2: Control Panel
Step 3: Go to the advanced tab in the windows firewall window and choose the ICMP settings button (circled in red)
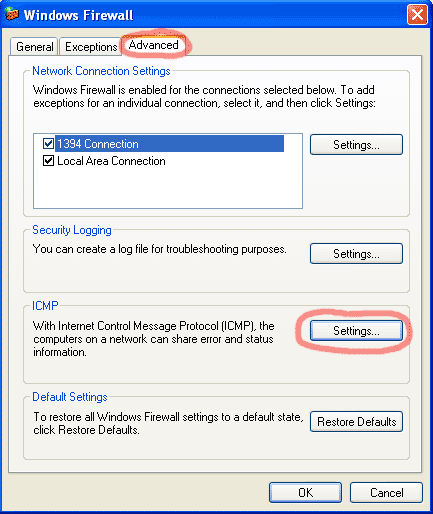
Fig 4.3: Advanced Tab in Firewall Settings
Step 4: You need to check the options circled in red; Allow incoming echo request, allow outgoing destination unreachable and allow outgoing time exceeded. Once you have done this click ok and you're done.

Fig 4.4: ICMP Settings Window
ZoneAlarm Pro
Step 1: Click Start --> Programs --> Zone Labs --> Zone Labs Security as shown in fig 5.1 below
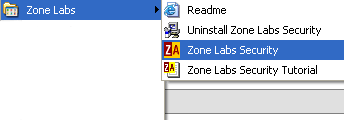
Fig 5.1: Start --> Programs --> Zone Labs --> Zone Labs Security
Step 2: In the main ZoneAlarm Pro you need to click the Firewall tab on the left hand side as indicated by the green circle
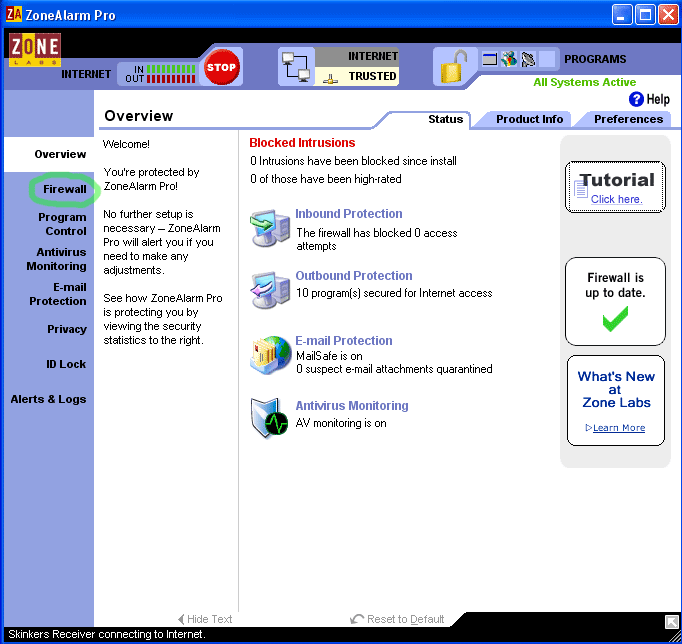
Fig 5.2: ZoneAlarm Main Window
Step 3: Depending on what security section you are setup for then choose one of the 'custom' buttons circled in green below
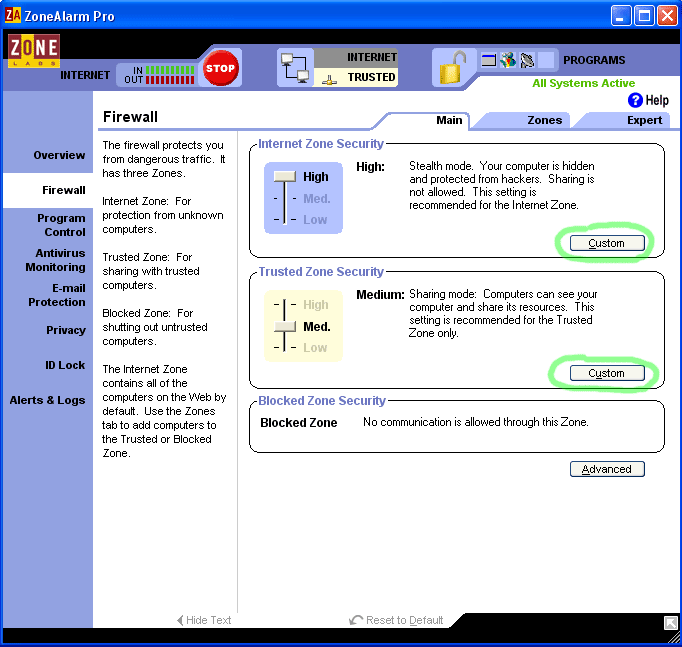
Fig 5.3: Firewall Main Window
Step 4: By clicking on the custom button in fig 5.3 you will get a window like that one below in fig 5.4. You need to select the options as shown in fig 5.4.
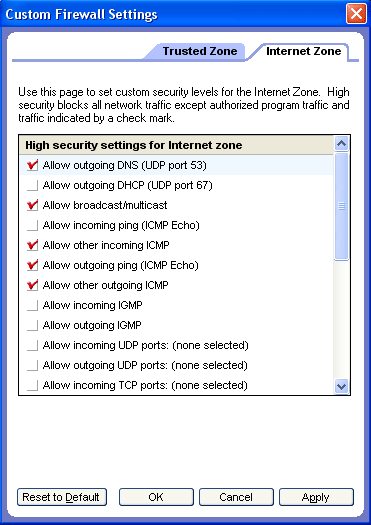
Fig 5.4: Firewall Settings
McAfee Personal Firewall
McAfee should not affect VisualIPTrace. If it does then please contact support.
When you first use VisualIPTrace McAfee will ask if you to grant access to jview.exe or java.exe. Once this is done VisualIPTrace will work without problems.
Trend Micro PC-cillin
Step 1: Open the PC-cillin firewall main configuration panel
Step 2: Click Network Security
Step
3: Click Personal Firewall
Step 4: Click the 'dialog' icon shown in the red circle below. This probably appears next to 'Direct Connection' if default settings have not been altered
Step 5: Click Edit
Step 6: Open the Exceptions tab
Step 7: Click Add
Step 8: Enter the following details into the form:
Description: ICMP
Target: All applications
Connection: Incoming
Action: Allow
Protocol: ICMP
Type(s): All types
Type: All IP Addresses
Step
9: Click OK
Step 10: Click Add again
Step 11: Enter the following details into the form (blue text indicates differences to the previous entries):
Description: ICMP 2
Target: All applications
Connection: Outgoing
Action: Allow
Protocol: ICMP
Type(s): All types
Type: All IP Addresses
Step 12: Click OK
Step
13: Click Apply and close the main PC-cillin console.
|