 |
|
VisualRoute® Online Manual |
Manual Index
1.Installing VisualRoute

First, make sure that you meet the minimum requirements for your platform, including the proper Java VM. Then install VisualRoute:
Windows: Run the 'vr.exe' install program, by opening the file or double-clicking the filename, then follow the instructions.
UNIX: To install VisualRoute for UNIX, follow these steps:
- Login as root. You should be root user to install, but not to run VisualRoute (refer to Appendix A for notes on 'running as a user')
- Uncompress "uncompress vr.tar" or gunzip "gunzip vr.tar" the download file.
- Untar this file "tar -xf vr.tar" to create a directory in your present directory of vr9
Mac: Within 'Finder' double-click on the downloaded StuffIt vr.pkg.sit self-expanding file, this will create the vr.pkg file structure. Next, within 'Finder', double-click on the vr.pkg structure and this will start the 'Installer', then follow the instructions.
2. Running VisualRoute
Windows: Go to Start / Programs / VisualRoute and click on VisualRoute. If you are running under NT/Win2000/XP, it is possible to configure VisualRoute to run as a Service in the Business, Support, Professional Support and Server Editions:To do this:
Run VisualRoute Server to configure and verify that it runs properly; Exit VisualRoute
In a DOS prompt window, change to the VisualRoute install directory and press Enter. For example:
Type CD \Program Files\VisualRoute and press Enter
Type "VisualRoute -install" and press Enter
Run the Services Manager (Control Panel) and start the "VisualRoute" service.
UNIX: To run VisualRoute for Unix follow these steps. It is possible to configure VisualRoute to run as a daemon service that is started at system boot. Refer to Appendix A for details.
- Change to the install directory "cd vr9"
- Make sure that the current directory ('.') is in the PATH environment variable by typing "env | grep PATH". There may be perhaps two or more environment variables that have PATH in them. If it's not already there then set it with (assuming a Kourne shell) "PATH=$PATH:.; export PATH". Note: You could also amend the profile of the account that will be running VisualRoute to include ('.')
- If using a Java 1.1 Runtime Environment (JRE), type "jre vr" to run VisualRoute. Otherwise, type "java vr"
Mac: VisualRoute is installed in the /Applications/VisualRoute folder. Click on the VisualRoute application in this directory to start VisualRoute.
3. Running VisualRoute for the First Time
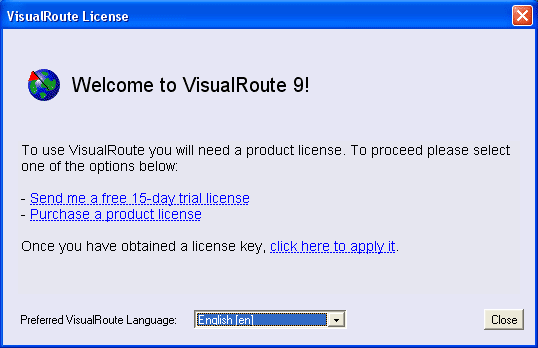
When you run VisualRoute for the first time, you will need to apply a purchased license key or a 15-day trial key, which may be obtained by selecting one of the options in the Welcome screen (Fig 3.1). You may also select your preferred language for VisualRoute. The language may be changed at any time under the "Options/Language" menu option.
Fig 3.1: VisualRoute Startup Window
4. VisualRoute Toolbar and Display
VisualRoute has two options included in the toolbar in the top right hand corner of the GUI (see Fig4.1 below)
Fig4.1 - Toolbar Options
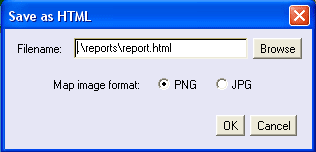
Save - The first icon on the toolbar is the save icon. By clicking this you will get the display below (Fig4.2.) This saves the table and map view as an html document. You can choose between two image formats also (PNG and JPG.) When OK is clicked it will bring up the HTML document for you to view. The default folder for saving is the VisualRoute install folder.
Fig4.2 - 'Save' Display
Snap as Text - The second icon on the toolbar is the snap text icon. This captures the information from the table and automatically pastes into a word processing program
VisualRoute includes a textured (physical) map option for the initial 3 zoom levels. For zoom-in's beyond 3 levels the map changes to the traditional untextured (political) map. You may change the default map type at any time under the Options, Preferences, Display/GUI dialog. You can also customize your own view. Simply choose the 'Options' --> 'select layout' menu option. Select the layout you want (see Fig 4.3 below) and then click 'OK'
Simply choose 'Options' --> 'select layout' from the toolbar and you will get the dialog box above. Select the layout you want and then click 'ok'
Fig 4.3: 'Select Layout' dialog box

5. Select a Host to Monitor
Enter the host and optional port that you want to monitor into the address box in VisualRoute (Fig 5.1) and either press Enter or press the start arrow to start VisualRoute:
Fig 5.1: Host address boxTIP: Copy (ctrl-c) a host name or URL from any other application and paste (ctrl-v) into the VisualRoute edit box in Fig 5.1. Or use the right mouse button (use Meta-click on Mac; Meta is Apple key) for a context menu.
Port/Probe Testing (Business, Support and Server editions only):
When you are running either the Business, Support or Server editions of VisualRoute you have to option of port testing. The address box in these editions is shown below (fig5.2)
Fig 5.2: Business, Support and Server Address BoxSelect your protocol from the drop-down list (to see for example which HTTP server is running select HTTP) and enter the port number. By default the port number is set to the default for that protocol, so for HTTP it would be 80 and for FTP it would be 21 etc. Protocols supported are HTTP, FTP and SMTP.
By clicking the green arrow or hitting enter VisualRoute will tell you what HTTP, FTP or SMTP server is running behind that port or if there is no such server on that port.
VisualRoute has a special "protocol" that is listed as 'port'. The idea of this is that it simply checks whether the port specified is open or not. It will tell you if the remote system is accepting communications to the port, rejecting them, or ignoring them. It makes no attempt to check what server is behind the open port, it literally just sees if the connection attempts are accepted or not.
6. Select and IP address to Monitor
After entering a host / port that you want VisualRoute to monitor (Fig 5.1), VisualRoute will resolve the host name to a list of IP addresses and automatically start a trace route to the first IP address in the list.
You may start a new trace route to a different IP Address at any time by selecting any of the other IP addresses from the list. Any currently running trace route will be stopped and the new one started.
Many Internet hosts will resolve to only one IP address. Other very large sites (such as www.microsoft.com and www.nytimes.com) will resolve to many IP addresses.
7. VisualRoute Analysis
The analysis section for the same trace looks like:
Fig 7.2: VisualRoute Analysis in Advanced ModeThis analysis section will explain in English what is going right or wrong in the trace. It will assist you in pinpointing problem areas in the trace. The blue underlined text in the analysis box can be clicked on for a fuller explanation of error messages.

8. Trace Route Table
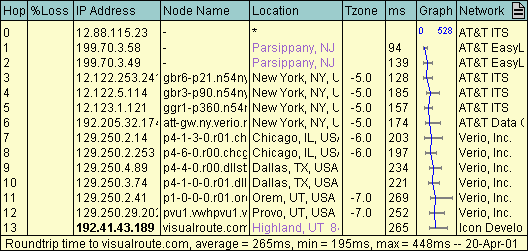
A typical Trace Route Table section looks like Fig 8.1:
Fig 8.1: Trace Route TableTIP: You can use your mouse to resize the table columns by dragging the right edge of a column.
Note: In general, text that is displayed in purple is non-authoritative (from a local cache on your hard drive maintained by VisualRoute) and text displayed in black is authoritative. Non-authoritative information is validated as soon as possible, but is displayed immediately to speed up the display of information to you.
Clicking an item in the node name column will show a domain whois, if available, for that hop's domain. Similarly, the network whois for a hop can be accessed by clicking the relevant item in the 'Network' column.
The columns in this table are:
Hop The trace route hop count. % Loss This shows the percentage of ping packets that have been lost at this hop level. This number is red if a host is detected at this hop level. This means that ping packets are being lost. Otherwise, this number is black, because the host may just be ignoring all of our ping packets. This number is updated as the trace is completed, however if you should stop a trace before completion this value may not be totally accurate as VisualRoute may still have been waiting for responses from some of the ping packets that it had sent. IP Address The IP address of the host at this hop level. It is red if a recent ping packet was lost. It is blue when it matches a Loose Source Route IP address. Otherwise, it is black. The IP Address is bolded if it is the host that you are trace routing to. Node Name The reverse DNS lookup of the IP Address. Location The geographical location of the node. It is black if we are fairly certain of the node's location. Otherwise it is purple, meaning that the location is a best guess based upon information from various WHOIS databases. Click on the location for details. Tzone If the location of the node has been resolved then the time difference to your selected time zone will be displayed. You can change the base time zone that VisualRoute uses in Options -> Preferences -> Analysis Columns ms The average number of milliseconds (roundtrip) that it took for a ping packet to go from your machine to this hop level and back to your machine (just like the system 'tracert' program). Graph The blue line is a graph of the 'ms' column. The grey horizontal bar in each hop line represents the minimum and maximum millisecond times for that hop level. Network The network that this node is in, as reported by various WHOIS databases.
9. Trace Route Map
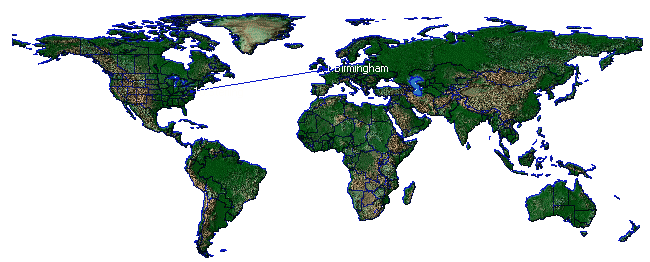
A typical Trace Route Map section looks like Fig 9.1:
Fig 9.1: Trace Route MapThe trace route is displayed on a map of the World. Links drawn in blue indicate known locations. Links drawn in purple indicate that a guess was made.
Left Mouse Click Zoom IN Right Mouse Click¹ Zoom OUT Mouse Drag Moves the map around ¹ Use Meta-click on Mac (Meta is Apple key)
VisualRoute will immediately redraw the map as new information becomes available from the trace route. In some cases, this will result in lines previously drawn looking like they are being erased and drawn elsewhere. You are just seeing VisualRoute update its map information in real-time.
10. VisualRoute Menu Options
FileSave as HTML... - Saves the current view to an html page
Print... - Prints the heading, analysis, table, and map.
Exit VisualRoute - Exits the VisualRoute application.Edit
Copy, Paste - Clipboard support.
Snap table as text... - This will snap a text version of the heading, analysis, and table. Great for e-mailing the results!
Save Table/Map Image (as JPEG) - Allows you to save the traceroute Table and World Map as a graphic in the JPEG format.
License Key... - Allows you to enter or change the product license key.Options
Language... - Displays a dialog that allows you to select English, French, German, or Spanish as the language.
Reset Map... - Fully zooms out of the map and places it in the centre of the screen.
Column Preferences - This will bring up the column preference tab from the preferences screen. This will allow you to change the titles within the table to what you consider more important
Select Layout (Personal and Server editions only) - This allows you to customize your view within VisualRoute (see Fig4.3)Preferences... - Displays the VisualRoute Preferences Dialog.
Tools
Database Updater... - This launches a dialog box which allows you to add node naming conventions and locations to IP addresses. It is also now where you can set your home location
eMailTracker... - A tool that allows you to track email servers, given an email address. However, if you are looking to track an actual e-mail received, use eMailTrackerPro.
Ping Grapher... (Business and Server Editions only) - Shows the VisualRoute Ping Grapher dialogReverse Trace Server... (Support and Professional Support Editions Only) - Launches the Reverse Trace Server preferences and setup dialogs
VisualRoute Server... (Business and Server editions only) - Launches the VisualRoute server preferences and setup dialogs
Help
Support... - Takes you to this web page.
Product Feedback... - Takes you to our Feedback web page
VisualRoute Home Page... - Takes you to the VisualRoute home page
Frequently Asked Questions... - Takes you to our FAQ web page.
How to Purchase... - Takes you to our Purchase web page.Newsletter Signup... - Takes you to the Newsletter signup webpage
Debug Console... - Launches the Java Console window
About... - Displays the About box. The amount of memory used by VisualRoute in the Java VM is displayed in this dialog.
11. VisualRoute Preferences Dialog
To view the preferences dialog, select "Preferences..." in the Options menu. The tabs in this dialog are:
12. Display/GUI Tab
The Display/GUI dialog tab looks like Fig 12.1:
Fig 12.1: Display/GUI Tab
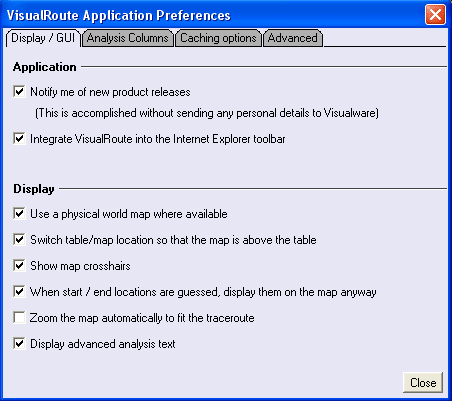
The Application Options are:
Notify me of product releases - Does as it says. When a new version of VisualRoute comes out you will be notified when starting VisualRoute
Integrate VisualRoute - This adds a VisualRoute logo to the Internet Explorer toolbar. This allows you to trace that site you are currently on when you press the VisualRoute button
The Display Options are:
Use Physical Map - When checked a textured map will be displayed showing mountain ranges etc, when unchecked a basic colour map will showSwitch table/map location - This allows you to change the location of the map and table in the main view of VisualRoute. By default this option is turned on; by deselecting the table will appear above the map.
Show Map Crosshairs - When a trace is plotted on the map the end location is displayed under a crosshair
Start/End locations - When the start and end locations of a trace are guessed this option tells VisualRoute to plot them on the map anyway. By default this option is turned on.
Auto zoom to Traceroute - Enables auto zooming of the map to show just the locations of the hosts for the current trace. The zoom level of the map will update realtime as more locations are resolved.
Display Advanced Analysis text - VisualRoute can display more information about a traceroute in an advanced analysis. By default the advanced analysis is turned on.
13. Analysis Columns Tab
The Analysis Columns dialog tab looks like Fig 13.1:
Fig 13.1: File & Caching tabThe Analysis Columns Options are:
Column Preferences - This allows you to change which columns are visible, and the order in which columns are shown. Simply choose a column then move it up or down using the buttons in the centre of the dialog box. You can also remove or add columns using the hide and show buttons also in the centre of the dialog box

14. Caching Options Tab
The Caching Options dialog tab looks like Fig 14.1:
Fig 14.1: Analysis Columns TabThe Caching Options are:
The only options is the 'Use the stored local whois as authoritative whois information' check box. By default this is checked which allows any whois information on your machine to be used when running a trace in VisualRoute.
All the cache explanations are in the yellow box at the bottom of the dialog box. To clear a cache just click the 'Clear Now' button to the right of the cache you wish to clear.

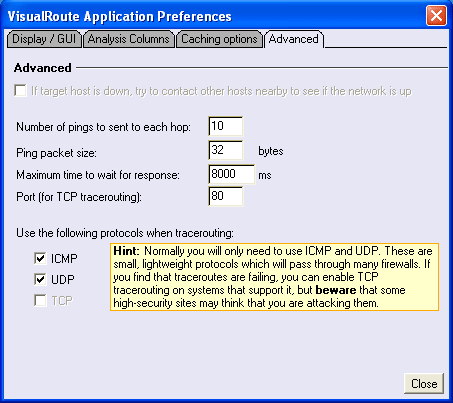
15. Advanced Tab
The Advanced dialog tab looks like Fig 15.1:
Fig 15.1: Advanced TabThe Advanced Options are:
The greyed out options are only available in the Business, Support and Server editions of VisualRoute.
If target host is down, try to contact other hosts nearby to see if the network is up - if VisualRoute cannot contact the host you specified, checking this option causes VisualRoute to scan that host's network. This allows you to discover whether the host cannot be contacted because its entire network is down, or if it is just that one specific host within the network with connectivity trouble. For more information see Appendix D. (Business, Support and Server editions only).
Number of pings sent to each hop - you can set the number of pings you want to be sent to each hop of the traceroute
Ping packet size - you can set the number of bytes in each packet that is sent out in a traceroute
Maximum time to wait for response - you can set the maximum time in milliseconds you want VisualRoute to wait for a response from a specific hop. The request will timeout once that time is passed
Port (for TCP tracerouting) - allows you to set the port number for TCP tracerouting
You can also choose your protocol: ICMP, UDP and TCP (Business, Support and Server editions only)
16. Database Updater
These instructions apply to VisualRoute Version 9 and above. If you have a version prior to this, please upgrade.
The initial screen you are presented with when starting the database updater is shown below in fig 16.1:
Fig 16.1: Database updater initial screenYou have three options in the database updater which are detailed below, you can either add a location to a node name, add a location to an IP or you can set the home location that all traces start from.
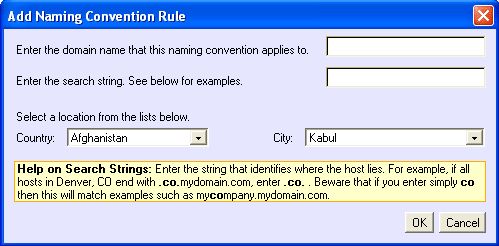
Node Naming Conventions:
Fig 16.2: Add Naming Convention Rule dialog boxWhen entering a naming convention you have to enter a domain that the naming convention applies to, which is done in the first text box. You also have to enter the search string, examples are given in the yellow box at the bottom of the dialog box.
To choose the location simply select the country and city from the drop down menus
IP Addresses:
Fig 16.3: Add IP Address Rule dialog boxAdding a location to an IP is the same as adding one to a node name, the only difference is you have to enter the IP address or CIDR range you want and not a node name.
Set Home Location:
Fig 16.4: Set Home Location dialog boxThis setting is pretty self explanatory; to set the home location simply check the 'All traces begin from the same geographic location' check box then choose the country and city from the drop down menus.


17. eMailTracker in VisualRoute
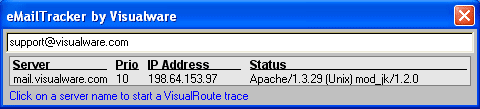
VisualRoute has the ability to trace an email address. By choosing the 'eMailTracker' option in the tools menu you will get a dialog box like the one below in fig 17.1:
Fig 17.1: eMailTracker in VisualRouteSimply enter the email address/domain name you wish to trace then press the 'Enter' key. An example trace is shown below in fig 17.2:
Fig 17.2: An example trace using eMailTrackerOnce the trace has finished you can see information such as the mail server, the IP address and the status of the mail server. You can trace the server or IP address using VisualRoute by clicking on either the server name or the IP address.
For more detailed eMail tracking please consider our eMailTrackerPro product which traces emails headers.

18. Ping Grapher
Ping Grapher is only available in the Business, Support and Server editions of VisualRoute
The VisualRoute Ping Grapher feature offers the ability to measure a network device's latency continuously at specified intervals.
To access this feature, select the 'Ping Grapher' option from VisualRoute's Tools menu. You will be presented with the following dialog box:
Fig 18.1: Ping Grapher DialogSimply enter the IP address or hostname of the system whose latency you wish to monitor, and the interval at which it should be monitored, and press enter.
You can select the zoom level using the Zoom to drop-down list box. A zoom level of 240 seconds means that 240 seconds of data is displayed in the graph window.
As data gradually builds up, it will fill the entire plot area and will automatically scroll rightwards as new data is made available. To view a specific part of the history, deselect 'Auto Scroll' and the 'Select time' scrollbar will be made available. Use this bar to scroll through the history data.
To hide dialog controls in order to maximize the plot area, click 'Hide'

19. Reverse Trace Server
Reverse Trace Server is only available in the Support Editions
The Reverse Trace Server allows support users to perform a trace as if from the customers desktop to verify what a problem maybe
Fig 19.1: Reverse Trace ServerChoose the IP address and port number you wish and the click apply. Once you have customized these options then click 'Start' to start the Reverse Trace Server. When started the 'Test' button will become available and can be used to see what the server page will look like (fig19.2)
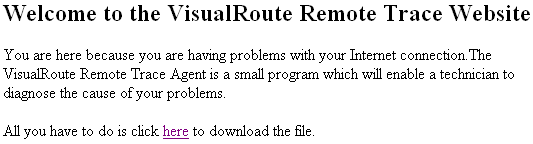
Fig 19.2: Server pageWhen you need to perform a trace you send the customer to this page which will be the IP and port number of the machine you have set the Reverse Trace Server up on (for example 192.168.0.1:82). The customer then has to download the file where indicated on the server page.
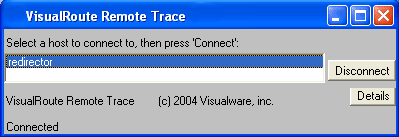
Fig 19.3: Remote Trace Dialog BoxThe file the customer downloads is called helpdesk.exe. He/she needs to run this exe when downloaded. It will appear as in fig19.3 above. As soon as the customer has run this exe a check box will become available in your main VisualRoute window (fig19.4 below)
Fig 19.4: Support ConnectionWhen this check box is checked the next trace you perform will be as if you were on your end users machine. Both the end user and the support technician can disconnect at any time if they feel the need to. When the support technician is connect to an end user the end users details will appear in the 'Support Engine' section of fig 19.1 above. Below the details you will see a 'Disconnect User' button.
Note for Professional Support Edition Users:
The dialog that this section describes has now changed in the new Professional Support edition. This edition allows many users to connect to the server, so instead of having a message saying 'The following user is connected to the reverse trace server: xxxx from xxxxx", we now have a list of users. Also, instead of a checkbox saying 'use reverse trace connection' in the main application window, we have a similar drop-down list. The standard support edition (which allows only 1 user to connect) is still available, and the dialogs are as previously.

20. VisualRoute Server
VisualRoute Server is only available in the Business and Server editions of VisualRoute
VisualRoute can be configured to run as a (web) server, providing visual trace route capabilities to anyone with a Java-enabled web browser. This is how our Live Demo works. This is very useful when:
- You want to provide the VisualRoute service to your clients.
- You may not want to install VisualRoute on lots of client machines. Installing it on one server and granting access to people allows you to control access.
- Your company has a very strict firewall that blocks any traces, so how do you diagnose network connectivity problems? Install VisualRoute on a server outside the firewall and grant access to people in the company.
- You want to provide visual trace route capabilities to your entire company.
Note: VisualRoute Server acts as its own Web server, and does not require IIS, Apache or any 3rd party Web server application to function.
To enable VisualRoute Server, go to Tools / VisualRoute Server... in the menu and you will see a status dialog that looks like Fig 20.1:
Fig 20.1: VisualRoute Server Status DialogJust press the 'Start' button to start the Server component of VisualRoute. Users can now use a Java-enabled web browser to connect to your server and perform visual trace routes.
Preferences / General Tab: When you press the Preferences... button in the Fig 20.1 dialog, you will see the Fig 20.2 dialog:
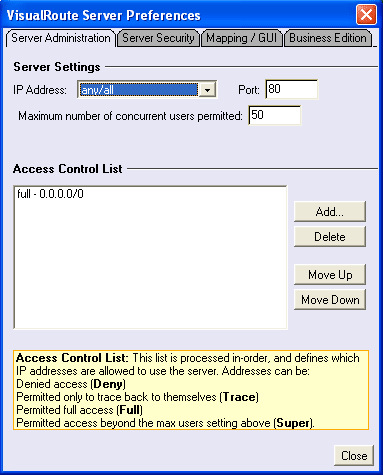
Fig 20.2: VisualRoute Server General Preferences DialogThe VisualRoute Server preference options are:
IP - Allows you to configure VisualRoute Server to run under any/all IP address on the machine, or only on the specified IP Address, which is very useful if you want VisualRoute Server to coexist with IIS on the same machine (see the note at the end of this section).
Port - The port number that the server will use. The default is the standard WWW port 80. To change the port, enter in a new number and press Enter. You will need to change the port number if you install VisualRoute Server on a server that already has a web server service (port 80 used).
Max Users - The maximum numbers of users that can perform a VisualRoute trace concurrently. To change this setting, enter in a new number and press Enter.
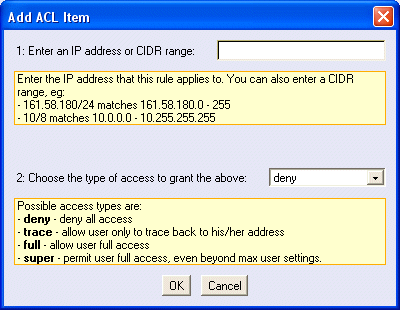
Access Control List - By default, the server grants full access to anyone who can connect to the machine/port. The access control list allows you to fine-tune access based upon a list of 'access verb and CIDR address'. This 'Access Control List' is processed in-order (top to bottom) and the first entry to match the client's IP address is the access entry that is used. If no entry in this list matches, then access is denied. The access verbs are:To add an entry to the Access Control List simply click the 'Add' button and you will be presented with the dialog box below (fig 20.3)
Fig 20.3: Add ACL Item Dialog Box
deny - denies all access trace - allow trace only back to originating ip address full - allows full access to all features super - full access, even past max users So, as an example, if you wanted to grant full access to everyone in your company, but no one else, you would delete the default 'full - 0.0.0.0/0' entry, select the 'full' verb, enter in the CIDR for your company and press 'Add to List'.
Security Tab: The security tab looks like Fig 20.4:
Fig 20.4: VisualRoute Server Security Preferences DialogServer Security - These options control the number of traces users may perform and allows you to set a username/password for admin objects.
Restrict Applet Hosting by Domain - Allows you to control the domains that can host the VisualRoute applet from your VisualRoute Server. Used to prevent unauthorized use of your VisualRoute server by other sites that attempt to access the VisualRoute applet and service via the Java codebase attribute. Please note that you must list all URL domains that are authorized to access your VisualRoute Server. For example, for http://visualroute.visualware.com, both visualroute.visualware.com and 161.58.180.113 would be added to the list.
Mapping/GUI Tab: The mapping/GUI tab looks like Fig 20.5:
Fig 20.5: VisualRoute Server Mapping Preferences DialogThe GUI options allows you to adjust the look and feel of the applet within the web interface. You can set options such as zoom levels on the map and simplified controls.
Business Edition Tab: The Business Edition tab looks like Fig 20.6:
Fig 20.6: VisualRoute Server Business Edition TabThis section allows you to set the username and password for the applet. Anyone who wants to go to the server has to enter the username and password. Providing this is done they are granted full use of VisualRoute server.
NT/Win2000/XP Service: To run VisualRoute Server as a Windows NT/2000 service, just follow these steps:
- Run VisualRoute Server to configure and verify that it runs properly; Exit VisualRoute
- In a DOS prompt window, change to the VisualRoute install directory and press Enter. For example,
Type CD \Program Files\VisualRoute and press Enter
- Type "VisualRoute -install" and press Enter
- Run the Services Manager (Control Panel) and start the "VisualRoute" service.
Similarly, to uninstall the service, follow steps 2 and 3 above, substituting "VisualRoute -uninstall" for "VisualRoute -install".
When installing VisualRoute as a service you may come across the "java.net.BindException: Address in Use" error. This means that another server is awaiting incoming connections on the port that has been selected (default 80). This maybe be caused by another copy of VisualRoute being run, possibly as a service.
Note: VisualRoute is now installed by default as 'interact with desktop' when it's being installed as a service.
Customizing the Server Web Page: When a client connects to the server, they get a web page that is automatically generated by VisualRoute. To create your own custom web page, create an HTML document that contains this HTML code:
<applet code="VisualRouteApplet.class" width=600 height=1024>
Java support required!
</applet>Then place this new HTML document into the VisualRoute "www" directory under the name "index.html". This new index.html will then be used when the client connects to the server.
Placing the VisualRoute applet on your corporate web server: If you want to integrate the VisualRoute Server applet into your corporate web server, you must use HTML code that looks like:<applet codebase="http://www.yourvrserver.com" code="VisualRouteApplet.class" width=600 height=1024>
Java support required!
</applet>Where http://www.yourvrserver.com is the URL to your VisualRoute Server (that is running and working). So, your corporate web server contains an HTML web page with the HTML code above and it points to your working VisualRoute Server (via codebase) so that traces can be performed. Please note that simply viewing the "www" folder files through your corporate web server will not work.
Starting a Traceroute Automatically: To start an automatic trace to a domain or IP address with VisualRoute Server, add '?go=www.host.com' or '?go=IP Address" onto the URL in your browser. For example:http://your-vr-server.com/?go=www.visualroute.com
will automatically launch VisualRoute Server and run a traceroute to 'www.visualroute.com'. This allows for great flexibility in creating custom Web pages with traceroute capabilities. For instance, the following input box is simple to include in html, and allows you to input a domain/IP directly, which will launch VisualRoute Server and run a trace to that domain. As VisualRoute Server may also be embedded in html code, it is easy to create a customized look and feel for your site while providing the traceroute functionality via an HTML form like:
<form action="http://your-vr-server.com/" method=get>
Host:
<input name=go size=25>
<input name=submit type=submit value="VisualRoute Trace!">
</form>Coexisting with IIS: Want IIS to use port 80 on one IP Address and VisualRoute Server to use port 80 on a different IP Address, but on the same physical machine? This works, but IIS has the nasty tendency to grab up all IP Addresses on a machine, even if IIS is not configured to use all IP Addresses. This prevents any other application from using port 80 on a free IP address. Microsoft Tech Note Q238131 has details on how to fix IIS. However, also make sure that you have no services set to use IP Address "All Unassigned", otherwise IIS will still grab all IP Addresses. Instead, make sure that you specify the IP Addresses that you want IIS to use for each type of service (HTTP, FTP, etc).
Preventing traces to Secure IP Addresses: To prevent a VisualRoute trace to a particular IP address (or range of IP addresses), edit the .\data\user\secure.txt text file (a file you must create). Each line in this file is "cidr-address,x". For example, here is an example secure.txt file that secures two IP ranges:198.242.57/24,x
201.109/16,xIf there is an attempt to trace directly to any secure IP in this list, it will be treated like a DNS error (does not exist). If the IP address shows up in a trace, it will be replaced by the 'x' in the line definition.


Appendices
A. Unix Notes
B. Protocols
C. Troubleshooting Guide
D. How 'Scan Network' works
E. US State Codes
F. Country Codes
G. Release HistoryAppendix A: Unix Notes
Running as a user: Before VisualRoute can be run as a user (non-root), you need to grant the VisualRoute ping engine the privileges it needs in order to run. The following commands should be submitted:
cd vr9/exe
su
Password: (enter password)
chown root:bin vrping1.*
chmod 4755 vrping1.*
exit
Running as a daemon service: For VisualRoute to be set up on Unix as a service/daemon, you will need to install the X virtual frame buffer software. This provides a virtual terminal without the need for a hardware console nor, even if the console is present, a sign on as this maybe construed a security issue. There is a VisualRoute shell script, VisualRoute.sh, provided for the placing in /etc/rc2.d. Basically the script has three environment variables at the beginning that the should be reviewed. They are:
- DISPLAY, this is required by the X software and VisualRoute.
- PATH, this needs three things to be present in its many directories. (1) the directory for the Java Runtime Environment executable. (2) the location of the directory for the X executables (3) the current directory for VisualRoute
- VRHOME, the installed directory of VisualRoute.
Once these have been changed the script can be saved, named as S95VisualRoute and copied over to the boot directory. Please ensure that this will start after the X font server software at boot (the process is xfs) , as some X fonts are required for the Xvfb to function
Other Applications Support: VisualRoute will still work without the following applications; you will just not get the functionality provided for the menu items referenced in each section.
Web Browser: The VisualRoute 'Help' menu item invokes a browser to access web pages. Netscape Communicator is the default. If you want another browser started, set the environment variable VR_BROWSER to specify the browser to start. You must either specify the absolute path, or the browser must be on the path.
Text Editor: The VisualRoute 'Edit | Snap table as text...' menu item uses a text editor to capture the generated report. By default GNU Emacs is used. If you want to start another editor, set the environment variable VR_EDITOR or VR_EDITOR_EQ (see below) to specify the editor to start. The editor must be started in a new window. When the environment variable is set, the default editor is overridden, and the specified editor is started with name of the file to edit, supplied by VisualRoute, appended to the end of the string provided by the environment variable. If both VR_EDITOR and VR_EDITOR_EQ are set, VR_EDITOR_EQ is used.
Visit http://www.gnu.org/software/emacs/emacs.html for more information on GNU Emacs. To obtain GNU Emacs (make sure to check on your Unix distribution first) visit http://www.gnu.org/order/ftp.html (scroll down quite a ways to the heading "How to FTP GNU Emacs)."
The environment variable VR_EDITOR_EQ (EQ for "end quote") appends a double quote after the file name supplied by VisualRoute. This is used, for example, when using the "gnome-terminal" command to start a new window and using the -e option to specify a program to start. The double quotes are needed to pass both the program and a parameter to the program (the file name). For example, to start vi as the editor using a gnome-terminal the following is the desired resultant command to edit a file named 'dog':gnome-terminal -e "vi dog"
(This assumes the gnome-terminal and the vi binary files are on the path.)
In this case, in order to get the ending double quote, set the environment variable VR_EDITOR_EQ. For example to create the string above, if VisualRoute used the file name 'dog', set the VR_EDITOR_EQ environment variable as:VR_EDITOR_EQ="gnome-terminal -e \"vi ";export VR_EDITOR
(This assumes the gnome-terminal and the vi binary files are on the path.)
This (bash shell) example uses a Gnome terminal to present the vi editor session in a new window. The backslash character, '\', is used to escape the double quote character, '"', following it so that the shell does not interpret it as the ending '"' character.
If you do not have GNU Emacs installed and you do not specify an other editor to use, then nothing will start for this menu item selection. By default, the emacs binary is assumed to be on the path.
Mail Program: Right mouse clicks (use Meta-click on Mac; Meta is Apple key) in the VisualRoute report 'Node Name' column access the WHOIS server information (RFC954). Informational items presented include an e-mail address. If the e-mail address is clicked, VisualRoute starts an e-mail application. By default this is Pine(r); a 'P'rogram for 'I'nternet 'N'ews and 'E'mail. If you do not have Pine the binary is available via anonymous ftp (make sure to check your Unix distribution first) from:
in the directories /pine/unix-bin or /pine/unix-bin-compressed. (Make sure to get the Unix binary.) For more information reference:
If you want to start another e-mail interface, set the environment variable VR_EMAIL or VR_EMAIL_EQ (EQ for "end quote") to specify the application to start. (See #2 above for a discussion of ..._EQ environment variables.) The specified e-mail application must be started in a new window. Note that the recipient's name is appended to the string provided by the VR_EMAIL or VR_EMAIL_EQ environment variable.
For example, if Pine were not the default selection, to set Pine to be the e-mail application started use VR_EDITOR_EQ as follows:VR_EDITOR_EQ="gnome-terminal -e \"pine"; export VR_EDITOR_EQ
(This assumes that both the gnome-terminal and the pine binary files are on the path.)
This bash shell example uses gnome_terminal to start Pine in a new window to send e-mail to the recipient name provided by VisualRoute. This will cause the final string, which is executed via a system() call, to be:gnome-terminal -e "pine "
If you do not have Pine installed and you do not specify another e-mail to use, then nothing will start for this menu item selection. This gnome-terminal launch method is the default method used for the e-mail application launch.
NOTE: If your are not running DNS you must enter the dotted decimal notation of the end-point computer in the Host/URL'. Without DNS, the local computer will not be able to resolve the IP address of the computer name you want to trace to.
How does the UNIX version differ from the Windows version? The UNIX version uses a different "ping" engine to elicit network responses. It also brings up different applications for the 'Edit | Snap table as text...', the 'Help' menu items, and e-mail. If web access (which can take several seconds to appear), the Edit menu item operations, or e-mail accesses fail, it may be because the path to the appropriate application is not in the PATH environment variable. Specifically, the path to 'hotjava' for browser access, the path to 'dtpad' for the editor, and the path to 'dtmail' for email for the defaults. Or, the path to the application specified by VR_BROWSER, VR_EDITOR or VR_EMAIL.
If you have used VisualRoute previously, the functionality should be the same.
Appendix B: Protocols
Port Name Description 7 ECHO Echo 13 DAYTIME Daytime 17 QOTD Quote of the Day 20 FTP-DATA File Transfer [Default Data] 21 FTP File Transfer [Control] 23 TELNET Telnet 25 SMTP Simple Mail Transfer 37 TIME Time 43 WHOIS Who Is 53 DOMAIN Domain Name Server 66 SQL*NET Oracle SQL*NET 69 TFTP Trivial File Transfer 70 GOPHER Gopher 79 FINGER Finger 80 HTTP World Wide Web 88 KERBEROS Kerberos 92 NPP Network Printing Protocol 107 RTELNET Remote Telnet Service 109 POP2 Post Office Protocol - Version 2 110 POP3 Post Office Protocol - Version 3 111 SUNRPC SUN Remote Procedure Call 119 NNTP Network News Transfer Protocol 123 NTP Network Time Protocol 137 NETBIOS-NS NETBIOS Name Service 138 NETBIOS-DGM NETBIOS Datagram Service 139 NETBIOS-SSN NETBIOS Session Service 161 SNMP SNMP 162 SNMPTRAP SNMPTRAP 179 BGP Border Gateway Protocol 215 SOFTPC Insignia Solutions 217 DBASE dBASE Unix 396 NETWARE-IP Novell Netware over IP 512 EXEC remote process execution 513 LOGIN remote login a la telnet 514 SHELL cmd 666 DOOM doom Id Software
Appendix C: Troubleshooting Guide
DNS lookups in VisualRoute fail for all host names. If you are running Zone Alarm, make sure that MS Java, vrdns2.exe, and vrping1.exe are all allowed access to the Internet.
Problems with eSafe and other anti-virus software. Several users have reported that running eSafe disables VisualRoute. This is because a 'feature' of eSafe prevents a Java application from running normally unless there is a "protection set" defined for it. Please refer to your eSafe manual for details on how to define this "protection set".
Problems with NetZIP. The NetZIP Folders feature interferes with how Java accesses class files in a ZIP file. When you attempt to run VisualRoute, you will get an "Unable to locate system class java\lang\Object" error message. The solution is to disable NetZIP while you run VisualRoute. You can temporarily disable NetZIP by right clicking on the NetZIP icon in the system tray and selecting 'Disable' from the menu.
Do you have the proper Java support installed? Most problems are caused by not having the proper version of Java installed. See the product Support page for more details.
Try reinstalling your Java VM. We have found that a lot of support issues are cleared up by reinstalling the Java VM. The problem is file versioning conflicts, which a reinstall clears up.
Test your internet connection. Do the system commands ping and tracert work? From a DOS window, try 'ping www.visualroute.com' or 'tracert www.visualroute.com'. If these commands do not work, please ask your network administrator if your TCP/IP stack is properly configured.
Are you running Microsoft's TCP/IP stack? VisualRoute works best with Microsoft's TCP/IP stack. The Microsoft TCP/IP stack comes with Windows.
Is your display set to 800x600, 256 colors, or better? This is a minimum requirement for VisualRoute.
Appendix D: How 'Scan Network' Works
WARNING: 'Scan Network' is an option that should be used with great care. While it can improve the VisualRoute analysis, high security sites may think that you are attacking their network.
If the host you are monitoring does not respond, is the network to that host down, or is the host itself down? With 'Scan Network' checked, VisualRoute can answer this question.
Scan network first determines which class C network the host in question resides in. It then sends ping packets to all possible IP addresses for the network, looking for any host that is up and running.
For example, let's say you are trying to monitor www.yahoo.com and it is not responding. With 'Scan Network' checked, VisualRoute determines that the network for www.yahoo.com is 204.71.200.x.
It then sends ping packets to hosts .x+1, .x-1, .x+2, .x-2, and so on for all hosts on network 204.71.200.x. The scan stops the moment there is any response, which indicates that the network to www.yahoo.com is up.
Appendix E: US State Codes
Code State al Alabama ak Alaska az Arizona ar Arkansas ca California co Colorado ct Connecticut de Delaware dc Dist.Columbia fl Florida ga Georgia gu Guam hi Hawaii id Idaho il Illinois in Indiana ia Iowa ks Kansas
Code State ky Kentucky la Louisiana me Maine md Maryland ma Massachusetts mi Michigan mn Minnesota ms Mississippi mo Missouri mt Montana ne Nebraska nv Nevada nh New Hampshire nj New Jersey nm New Mexico ny New York nc North Carolina nd North Dakota
Code State oh Ohio ok Oklahoma or Oregon pa Pennsylvania pr Puerto Rico ri Rhode Island sc South Carolina sd South Dakota tn Tennessee tx Texas ut Utah vt Vermont vi Virgin Islands va Virginia wa Washington wv West Virginia wi Wisconsin wy Wyoming
Appendix G: Country Codes
Code Country af Afghanistan al Albania dz Algeria as American Samoa ad Andorra ao Angola ai Anguilla aq Antarctica ag Antigua and Barbuda ar Argentina am Armenia aw Aruba au Australia at Austria az Azerbaijan bs Bahamas bh Bahrain bd Bangladesh bb Barbados by Belarus be Belgium bz Belize bj Benin bm Bermuda bt Bhutan bo Bolivia ba Bosnia and Herzegowina bw Botswana bv Bouvet Island br Brazil io British Indian Ocean Territory bn Brunei Darussalam bg Bulgaria bf Burkina Faso bi Burundi kh Cambodia cm Cameroon ca Canada cv Cape Verde ky Cayman Islands cf Central African Republic td Chad cl Chile cn China cx Christmas Island cc Cocos (Keeling) Islands co Colombia km Comoros cd Congo cg Congo ck Cook islands cr Costa Rica ci Cote D'Ivoire hr Croatia (Hrvatska) cu Cuba cy Cyprus cz Czech Republic dk Denmark dj Djibouti dm Dominica do Dominican Republic tp East Timor ec Ecuador eg Egypt sv El Salvador gq Equatorial Guinea er Eritrea ee Estonia et Ethiopia fk Falkland Islands (Malvinas) fo Faroe Islands fj Fiji fi Finland fr France fx France, Metropolitan gf French Guiana pf French Polynesia tf French Southern Territories
Code Country ga Gabon gm Gambia ge Georgia de Germany gh Ghana gi Gibraltar gr Greece gl Greenland gd Grenada gp Guadeloupe gu Guam gt Guatemala gn Guinea gw Guinea-Bissau gy Guyana ht Haiti hm Heard and Mc Donald Islands hn Honduras hk Hong Kong hu Hungary is Iceland in India id Indonesia ir Iran iq Iraq ie Ireland il Israel it Italy jm Jamaica jp Japan jo Jordan kz Kazakhstan ke Kenya ki Kiribati kr Korea kp Korea (North) kw Kuwait kg Kyrgyzstan la Laos lv Latvia lb Lebanon ls Lesotho lr Liberia ly Libya li Liechtenstein lt Lithuania lu Luxembourg mo Macau mk Macedonia mg Madagascar mw Malawi my Malaysia mv Maldives ml Mali mt Malta mh Marshall Islands mq Martinique mr Mauritania mu Mauritius yt Mayotte mx Mexico fm Micronesia md Moldova mc Monaco mn Mongolia ms Montserrat ma Morocco mz Mozambique mm Myanmar na Namibia nr Nauru np Nepal nl Netherlands an Netherlands Antilles nc New Caledonia nz New Zealand ni Nicaragua ne Niger ng Nigeria nu Niue nf Norfolk Island mp Northern Mariana Islands no Norway om Oman pk Pakistan pw Palau pa Panama pg Papua New Guinea py Paraguay
Code Country pe Peru ph Philippines pn Pitcairn pl Poland pt Portugal pr Puerto Rico qa Qatar re Reunion ro Romania ru Russian Federation rw Rwanda kn Saint Kitts and Nevis lc Saint Lucia vc Saint Vincent and the Grenadines ws Samoa sm San Marino st Sao Tome and Principe sa Saudi Arabia sn Senegal sc Seychelles sl Sierra Leone sg Singapore sk Slovak Republic si Slovenia sb Solomon Islands so Somalia za South Africa gs South Georgia and the South Sandwich Islands es Spain lk Sri Lanka sh St. Helena pm St. Pierre and Miquelon sd Sudan sr Suriname sj Svalbard and Jan Mayen Islands sz Swaziland se Sweden ch Switzerland sy Syria tw Taiwan tj Tajikistan tz Tanzania th Thailand tg Togo tk Tokelau to Tonga tt Trinidad and Tobago tn Tunisia tr Turkey tm Turkmenistan tc Turks and Caicos Islands tv Tuvalu ug Uganda ua Ukraine ae United Arab Emirates uk United Kingdom us United States um United States Minor Outlying Islands uy Uruguay us USA uz Uzbekistan vu Vanuatu va Vatican City State ve Venezuela vn Viet Nam vg Virgin Islands (British) vi Virgin Islands (United States) wf Wallis and Futuna Islands eh Western Sahara ye Yemen yu Yugoslavia zr Zaire zm Zambia zw Zimbabwe
Appendix F: Release History
9.3c - May 12th, 2005
- Maintenance Release
9.3b - April 25th, 2005
- Maintenance Release
- Improved Whois reporting for domains Whois reporting has been updated to comply with recent changes in the Whois registries, and now reports contact information for most domains, including company name, address, administrative contact, and the complete domain record.
- Improved performance IP location lookups have been streamlined for faster reporting and greater efficiency.
9.2a - February 20th, 2005 (build 2652)
- New Professional Support Edition which includes a Mutli-Use Reverse Trace Server which allows you to:
- Easily troubleshoot remote customer connectivity problems and
- Get instant on-demand connectivity analysis from remote data centers
- Includes ability to add city locations for IP addresses, so you can add your own locations for more complete location reporting
9.0d - January 4th, 2005 (build 2600)
- Norwegian Language added
- Various Bug Fixes
- Allows you to specify the address of the VRDB server
9.0c - December 17th, 2004 (build 2584)
- Maintenance Release
9.0a - November 18th, 2004 (build 2555)
- Significant improvements to the IP location database update process
- you will automatically receive periodic location updates
- Improved user interface provides greater ease of use, more flexibility for display options
8.0f - May 31st, 2004 (build 2384)
- Fix for NT service uninstall problem
- German whois lookups use the correct server
- New database
8.0e - April 27th, 2004 (build 2352)
- Maintenance Release
8.0d - March 23rd, 2004 (build 2318)
- Maintenance Release
8.0a - November 12th, 2003 (build 2180)
- Textured physical map option
- Improved tracing capabilities
- New port testing capability
- New 'help' items and updated analysis messages
- New report display options
- Updated geo-IP database
- VisualRoute Server Edition option to prevent traces to private addresses
7.3b - October 3rd, 2003 (build 2174)
- Comprehensive IP database update
7.2a - June 20th, 2003 (build 2031)
- Comprehensive IP database update
7.1c - February 12, 2003 (build 1913)
- fixed uninstall problem
7.1b - February 11, 2003 (build 1893)
- supports UDP style pings
7.0g - December 19, 2002 (build 1858)
- misc bug fixes
7.0b - October 8, 2002 (build 1786)
- misc bug fixes
7.0a - September 24, 2002 (build 1772)
- Ping Grapher - continuously monitors latency of a host in real-time and displays the results on a graph
- Advanced / simple mode GUIs. Configure VisualRoute to show information in brief or in detail
- Improved geographical database
- Help popup support - to explain problems in traces and other error messages
- Changed mechanism for adding nodes to the geographical database
- Dutch language support
- Reset map option
- Tooltips
6.1e - September 5, 2002 (build 1752)
- Updated Whois and Network name information for ARIN
6.1a - July 5, 2002 (build 1688)
- Improved geographical database
- New analysis box with hyperlinks
- Bug fix for Whois lookups on .com.au and .ac.uk domains
6.0b - October 9, 2001 (build 1421)
- DNS Servers are now found in a OS language independent manner
6.0a - September 21, 2001 (build 1403)
- eMailTracker allows you to track email address to servers
- Internet Explorer toolbar integration
- New improved GUI
- Improved geographical database
- Better protocol detection and 'port probing'
- Improved installer
5.4a - July 26, 2001 (build 1347)
- Portuguese language support
- New VisualRoute Server security features
- Mac version is now a single click launch
- Workaround for a Windows 2000 SP2 WinSock bug
5.3a - June 26, 2001 (build 1317)
- Italian and Swedish language support
- Whois server updates
- Improved virus detection for install package
- Miscellaneous bug fixes
5.2c - April 24, 2001 (build 1254)
- Server: can now bind to one address on a multihomed server
- A problem adding places to the geographical database was fixed
- Miscellaneous bug fixes
5.2b - April 10, 2001 (build 1240)
- Map has a new look and feel
- Much smaller download size
- Updated geographical database
- Miscellaneous bug fixes
- New NT Service mechanism
5.2a - April 4, 2001 (build 1234)
- (beta test release)
5.1c - February 26, 2001 (build 1196)
- Server: Fixed server deadlock problem in the ping engine
5.1b - February 20, 2001 (build 1191)
- Server: Fixed DNS hang problem when lots of traces take place at once
5.1a - February 14, 2001 (build 1185)
- Language Support: French, Spanish, German
- Added HTML support when saving map/table
- Better quick help in dialogs
- Server: Applets support older versions of Netscape
- Whois fix for CA TLD
- Whois fix for RIPE
5.0b - June 7, 2000 (build 943)
- Map colors can be changed (better for lower resolution monitors)
- Percentage loss column show real time loss
- InetAddress memory leak has been addressed
- Most Recent Used list is now a floating dialog
- Reduced screen flicker when scrolling the main window
5.0a - May 1, 2000 (build 896)
- New colored zoomable map
- Autozoom map option
- Changed GUI Design
- Customizable ping packet size, number of pings, and timeouts
- Timezone information
- Easy addition of new hosts to database
- Support for hex encoded IP addresses
- Improved cache management
- Server: Updated zoomable maps
- Server: Domain and Network Whois information
- Server: Restrict referring web servers
4.2a - January 9, 2000 (build 783)
- Updated geographical database
- Updated handling of whois databases
- Corrected a bug causing the partially grayed-out host text box in the VisualRoute applet (client).
5.1c - December 19, 1999 (build 762)
- Solaris / Linux versions
5.1b - November 11, 1999 (build 724)
- Updated geographical database
- Added options to the Column Preferences dialog
- Added capability to allow copy/paste of information from the Hop Panel node list into the Host / URL text box.
- More consistent labeling of the "Snap" button.
- More conventional button placement on Whois popup dialog
- Consistent labeling on Web client page.
- More consistent Copy/Cut/Paste/Delete option enabling / disabling.
- More consistent item selection highlighting.
5.1a - October 19, 1999 (build 701)
- Updated geographical database
- Right mouse button context menus added to Enter Host text box, URL List, Map, and Table
- Save as JPEG option in Edit menu
- Multiple URLs can be selected in the URL list
- Mouse-selectable Table data
- Select columns to display dialog
- Vertical window resizing
- VisualRoute Server: Supports a default 'index.html' in the 'www' directory
- VisualRoute Server: Automatic starting of a trace by adding '?go=www.host.com' onto the URL in your browser.
- Changed 'England' to 'England/Scotland/N.Ireland'
- Support for the 'BR' domain
- Properly hide iconized windows under NT
- New Server Options: 1) Save map position on exit 2) Show map 3) "Fast zoom" option
4.0c - February 16, 1999 (build 456)
- Improved geographical database
- VisualRoute Server improvements: Fixed a memory leak, runs as a NT service, Server applet can be embedded within your own web page
- Added map/database for Italy
- Web Links ability for integrating VisualRoute into existing diagnostic web pages.
- 'Packing List' file integrity check the first time VisualRoute is run, which verifies the install and checks for viruses.
4.0a - November 30, 1998 (build 378)
- VisualRoute Server (details)
- Map Labels
- Added detailed maps for more of the world
- Better WHOIS caching
- New License technique
- Go/Stop button
- Added 'hop 0' as the local machine
3.3a - August 28, 1998
- Popup network and domain WHOIS support
- Loose Source Route (LSRR) support
- Vertical scroll bar
- More maps
- Removed ASN support
3.2c - July 1, 1998
- RFC 1876 (DNS LOC) support
- Changed how whois.ra.net was accessed
3.2b - June 24, 1998
- Trial works beyond trial period with limited functionality
- Added ASN support
- More maps
3.2a - April 20, 1998
- Support for non-Microsoft Java VM's
- Java 1.1 strongly recommended
- RFC 1918 (private use addresses) support
- Menu support
- URL host syntax to support other protocols/port
3.1b - April 3, 1998
- Greatly improved World support
- User-defined map data and locations
3.1a - March 19, 1998
- World map support
- Printing support (Java 1.1 required)
- Vertical scroll bar
- Clipboard support
2.1a - February 17, 1998
- Enhanced U.S. geographical database
- Full-featured trial period
2.0a - January 26, 1998
- Added a map of the United States
- Trial mode allows trace route to a limited set of sites
1.0a - November 17, 1997
- Ultra-fast multi-threaded trace route
- Results displayed in a Graphical User Interface
- Written in Java 1.0.